はじめに
標準的なドットやラインによるプロットは単調になりがちですが、画像をマーカーとして使うことで視覚的にインパクトのあるデータ可視化が可能になります。この記事では、matplotlibを使って画像マーカーによるプロットを実装する方法を詳しく解説します。
この記事で学べること
- 画像ファイルをマーカーとして使用する基本的な方法
- 画像の扱い方と透明度の設定
- マーカーサイズの調整とデータに応じた表示方法
- 実用的なユースケース(地図上の位置表示、カテゴリデータの視覚化)
準備
画像のダウンロード
いらすとやのサボテンのページから以下の画像をダウンロードします。ダウンロードした画像は.ipynbファイルと同じフォルダに入れます。
モジュールのインポート
- NumPy:数値計算用ライブラリ
- Matplotlib:プロット作成ライブラリ
- OffsetImageとAnnotationBbox:画像をグラフ上に配置するための特殊なクラス
バージョン情報
画像をプロットする関数
これが中心となる関数で、画像をマーカーとしてプロットします:
def imscatter(x, y, image_path, ax=None, zoom=1): 座標(x,y)に画像をプロットする関数を定義- 引数は座標値(x,y)、画像ファイルパス、プロット先の軸(ax)、画像の拡大率(zoom)
関数の内部処理
- 軸の設定:
axが指定されていない場合は現在のグラフ軸を使用 - 画像の読み込み:
plt.imread()で画像ファイルを読み込み、ファイルがない場合はエラー処理 - OffsetImageオブジェクト作成:読み込んだ画像を指定されたzoom値で調整
- 座標の処理:
np.atleast_1d()で座標をスカラーから1次元配列に変換(必要な場合) - 画像の配置:各(x,y)座標に対してAnnotationBboxを作成して軸に追加
- 軸の自動調整:データ範囲を更新し、自動スケーリング
a
関数を使用したプロットの作成
- グラフの作成:
plt.subplots()で5×4インチのグラフを作成 - ランダムデータ生成:
np.random.seed(42)で再現性を確保し、20個のランダム座標を生成 - 画像マーカープロット:
imscatter()関数を呼び出し、サボテン画像をマーカーとして使用 - 参照点の追加:同じ座標に通常の点もプロット(透明度0なので見えない)
- グラフの装飾:タイトル、軸ラベル、グリッド線を設定
- 表示:
plt.tight_layout()でレイアウトを調整し、plt.show()で表示
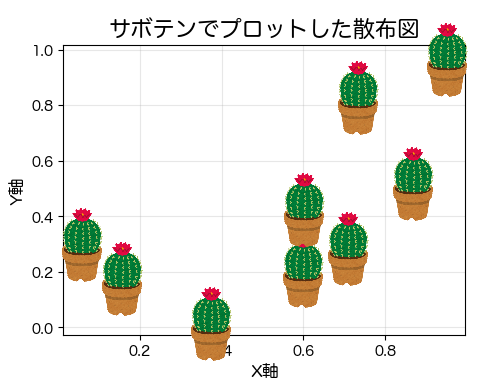
ここで紹介したコードにはいくつかの重要な技術的ポイントがあります。まず、AnnotationBboxクラスを使用することで、通常の散布図のマーカーでは実現できないような複雑な視覚要素をプロットに追加することができます。また、try-exceptブロックを使用して画像ファイルの読み込みエラーを適切に処理しているため、ファイルが見つからない場合でもプログラムが途中で停止することなく実行を継続できます。zoom引数を使用することで画像のサイズを元のサイズに対する比率で制御でき(例えば0.25は元のサイズの25%)、データリミットの更新とautoscale機能により、プロットした画像が自動的にグラフの表示範囲内に収まるよう調整されます。このコードを実行すると、ランダムに生成された(x,y)座標それぞれにサボテン画像が配置された散布図が表示されます。
応用:データに応じて画像サイズを変える
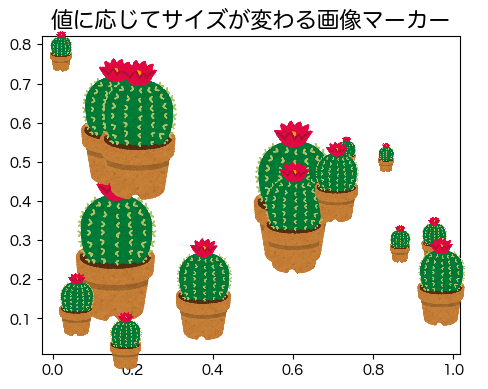
imscatter_sized関数の解説
この関数は、通常の画像マーカープロットを拡張して、第3の変数(z)に応じて画像サイズを変更できるようにしています:
- 引数: x, y座標、zサイズ変数、画像パス、プロット先の軸、ズーム係数
- 正規化処理: zの値を0.2~1.0の範囲に正規化して画像サイズを適切に調整
- 可変サイズプロット: 各点ごとに正規化したz値とzoom_factorを掛け合わせてOffsetImageのズームレベルを設定
使用例の解説
- データ生成: 再現性のためにnp.random.seed(42)を設定し、15個のx,y座標と、サイズ制御用のz値を生成
- zの範囲設定: z = np.random.rand(15) * 10で、0~10の範囲でランダムな値を生成
- プロット呼び出し: imscatter_sized関数を呼び出して、座標・サイズ・画像を指定
- タイトル設定: 「値に応じてサイズが変わる画像マーカー」というタイトルをax.set_titleで設定
この手法は、データポイントが持つ第3の変数(数値、重要度、カテゴリなど)を視覚的に表現するのに非常に効果的です。例えば、売上データの可視化や、地図上での人口密度表示などに応用できます。
透明度の調整
画像がRGBAフォーマット(アルファチャンネル付き)の場合、透明度を調整することでプロットの見た目を改善できます。
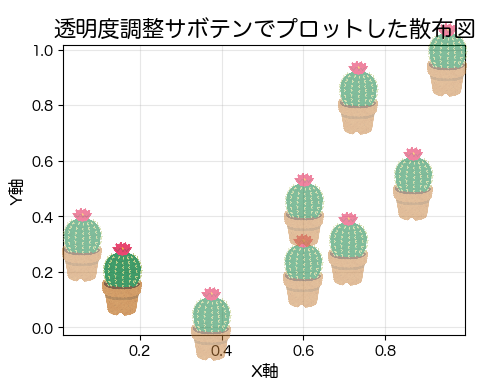
新しい引数としてalphaが追加されています(デフォルト値は1 = 完全不透明)
RGBAフォーマット画像の場合の処理は以下の通りです。
if image.shape[2] == 4:– 画像が4チャンネル(RGBA)かチェックimage = image.copy()– 元画像を変更しないようにコピーを作成image[:, :, 3] = image[:, :, 3] * alpha– アルファチャンネルに指定した透明度を乗算
この関数を使うと、マーカー画像の透明度を調整できるため:
- マーカーが重なる場合の視認性向上
- 背景とマーカーのバランス調整
- データの重要度に応じた透明度変更(
alpha引数と組み合わせ)
などが可能になります。
地理データの可視化の例
地図上に都市を表示
地理データの可視化に特に効果的です。都市、観光スポット、店舗などを地図上に画像アイコンでプロットできます。
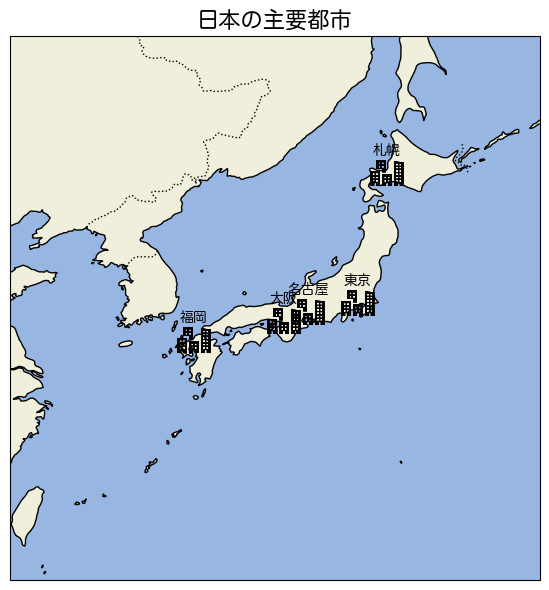
このコードは、matplotlibとCartopyライブラリを使用して日本の主要都市を地図上に画像マーカーでプロットするものです。主なポイントは:
- 地図表示範囲を日本周辺(経度120-150度、緯度20-50度)に設定
- 地図投影法としてPlateCarreeを使用
- 地図の背景として陸地、海洋、海岸線、国境を設定
- 日本の主要5都市(東京、大阪、名古屋、福岡、札幌)の緯度・経度情報を辞書で定義
- 各都市の位置にアイコン画像を配置するために、plt.imread()で画像を読み込み、OffsetImageとAnnotationBboxを使用
- 都市名をラベルとして追加(緯度に1を加えて少し上に表示)
気象データの可視化
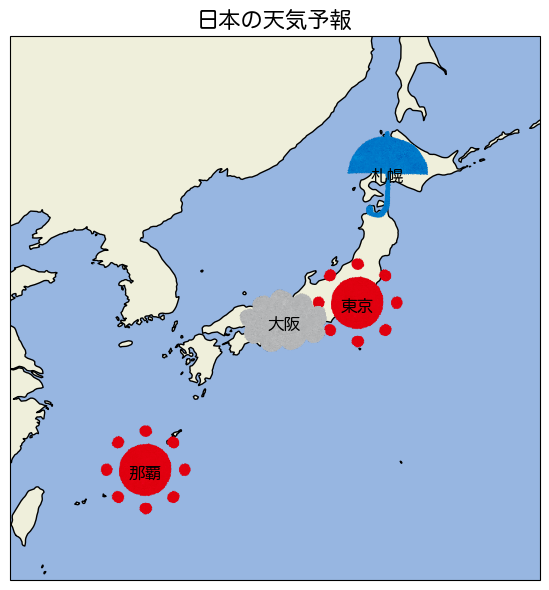
天気予報データを視覚的に表現するために、異なる天気アイコンを使用してプロットします。
主な機能は次の通りです:
- 仮想の天気データを辞書のリストとして定義(東京、大阪、札幌、那覇の位置と天気状態)
- 各天気状態(晴れ、曇り、雨、雪)に対応する画像アイコンのパスを辞書で管理
- Cartopyを使って日本地図を表示(陸地、海洋、海岸線を表示)
- 各地点の天気に対応するアイコンを読み込み、OffsetImageとAnnotationBboxを使って地図上の正確な緯度経度位置に配置
- 地名をアイコンの下に表示(lat-0.5の位置に配置)
- 地図の表示範囲を日本周辺(経度120-150度、緯度20-50度)に設定
まとめと応用のヒント
matplotlibの画像マーカー機能を使うことで、データ可視化に新たな次元を追加できます。以下のポイントを覚えておくと効果的に活用できるでしょう:
- 対象ユーザーに合わせた適切な画像選択が重要
- 画像サイズとプロット密度のバランスを考慮する
- アニメーションと組み合わせるとさらに効果的
- 大量データでは選択的に画像を表示し、残りは通常のマーカーで表示するなど
この手法は学術論文、プレゼンテーション、データダッシュボードなど幅広い用途で活用できます。ぜひ自分のデータ可視化に取り入れてみてください!
コードをダウンロード(.pyファイル) コードをダウンロード(.ipynbファイル)
コメント
ちょうど画像をプロットする方法を探しており、大変勉強になりました。
ありがとうございます。
1点質問なのですが、同じ座標の画像が重ならないようにジッタープロットを作成するにはコードをどのように改変すれば良いでしょうか。
seabornを使えば良さそうですが、具体的な処理が分からず質問させていただきました。
seabornのstripplotを使った画像-ジッタープロットの記事を公開しました。
ご参考ください。
https://sabopy.com/py/matplotlib-120/